Build a Blazor WebAssembly application using a rich text editor in a Flux-Redux architecture


This is the second post in a series on working with dotnet projects directly in your browser.
- Part 1 - Listing zip file content in Blazor
- Part 2 - Modifiying the content of the zip file in Blazor using a rich text editor in a Flux/Redux architecture
- Part 3 - Running a console application directly in your browser
Introduction
In this post, we’ll continue our journey in displaying the content of a zipped dotnet project in a Blazor WebAssembly application and then learn how to modify its content using a rich text editor.
Now that we have loaded our zipped project file, we need a way to store the content of the zip file in the application state so that we can navigate and view the different .cs files.
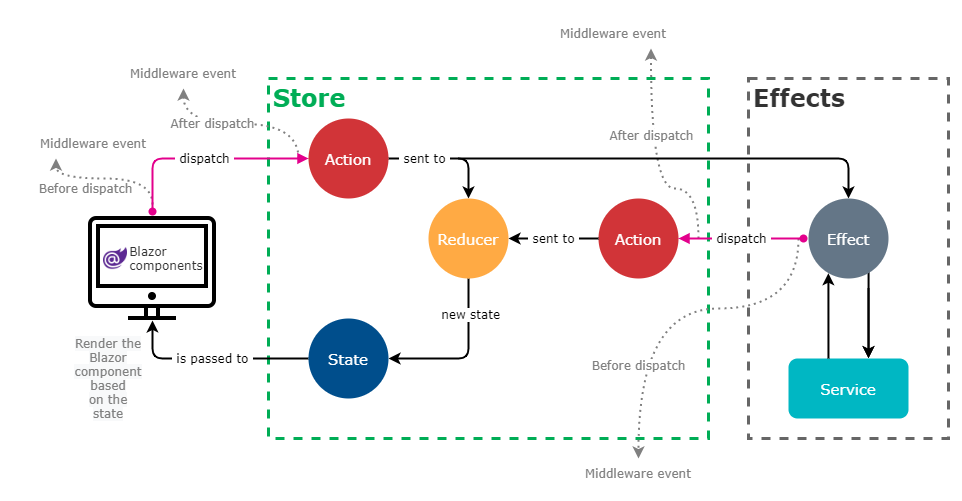
To achieve this, we’ll be using a “unidirectional data flow” architecture based on the Flux/Redux architecture. We’ll be going over how this presentation design pattern works at a high level as it’s not the objective of this post. We’ll explore this topic in a future article.
Here is the architecture diagram for the Flux/Redux architecture.
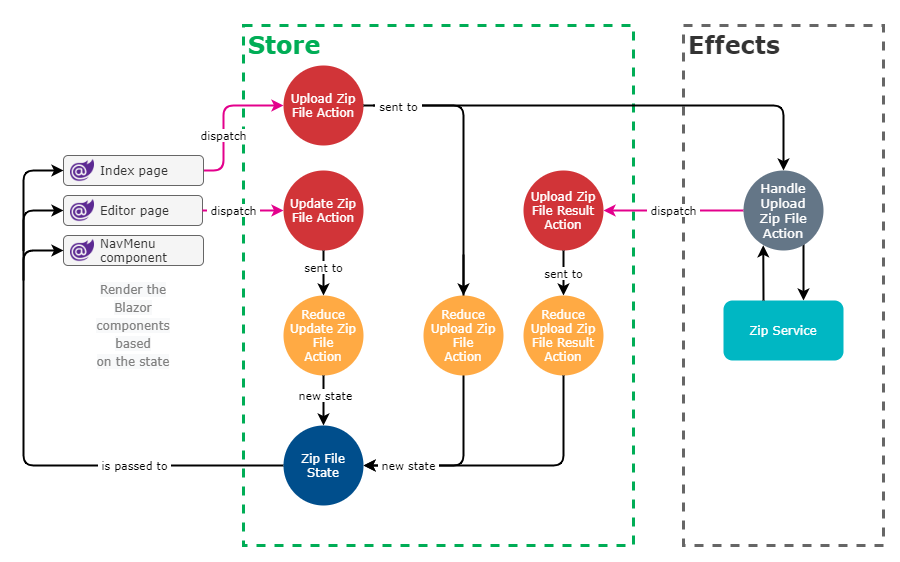
Here is the final Flux/Redux architecture diagram for our application.
The solution
Setting up Fluxor
Let’s start by installing the Fluxor packages. In the project file for our Blazor WebAssembly app, the
.csprojfile, add the following line:<PackageReference Include="Fluxor.Blazor.Web" Version="3.9.0" />In the host page
wwwroot\index.html, just above the tag add the following:<!-- ... --> <script src="_framework/blazor.webassembly.js"></script> <script src="_content/Fluxor.Blazor.Web/scripts/index.js"></script> </body>Next, in the
App.razorfile, add the<Fluxor.Blazor.Web.StoreInitializer />line to the root component.<Fluxor.Blazor.Web.StoreInitializer /> <Router AppAssembly="@typeof(Program).Assembly"> <Found Context="routeData"> <RouteView RouteData="@routeData" DefaultLayout="@typeof(MainLayout)" /> </Found> <NotFound> <LayoutView Layout="@typeof(MainLayout)"> <p>Sorry, there's nothing at this address.</p> </LayoutView> </NotFound> </Router>The last step is to register Fluxor as a service in
Program.csbuilder.Services.AddFluxor(options => options.ScanAssemblies(typeof(Program).Assembly) );
Creating the state, actions, reducers, and effects
Now that we have set up Fluxor we are ready to start using the Flux/Redux architecture in our application.
Create a
Storedirectory in the root of the project.In the
Storedirectory create aZipFileUseCasedirectory to hold the state, actions, reducers, and effects.Within the
Store\ZipFileUseCasedirectory create a new class namedZipFileState. This is the class that will hold the values of our state to be displayed in the application.public record ZipFileState { public bool IsLoading { get; init; } public IReadOnlyDictionary<string, ZipEntry> ZipEntries { get; init; } }Create a new class named
Feature. This class describes the state to the store.public class Feature : Feature<ZipFileState> { public override string GetName() => "ZipFile"; protected override ZipFileState GetInitialState() => new ZipFileState { IsLoading = false, ZipEntries = null }; }Next, we need to change the inheritance of the
Index.razorpage to inherit fromFluxor.Blazor.Web.Components.FluxorComponent.@page "/" @inherits Fluxor.Blazor.Web.Components.FluxorComponent <h1>Hello, world!</h1> <div class="drag-drop-zone"> <InputFile OnChange="OnInputFileChange" accept=".zip" /> @_status </div>In the code-behind file
Index.razor.csinject both the state and the action dispatcher.public partial class Index { // ... [Inject] private IDispatcher Dispatcher { get; set; } [Inject] private IState<ZipFileState> ZipFileState { get; set; } // ... }In
Store\ZipFileUseCasecreate the following actions.public record UploadZipFileAction { public Stream File { get; init; } } public record UploadZipFileResultAction { public IReadOnlyDictionary<string, ZipEntry> ZipEntries { get; init; } }In the code-behind file
Index.razor.cs, use the injectedIDispatcherto dispatch an instance of our newUploadZipFileActionwhen a file is chosen.public partial class Index { // ... private async Task OnInputFileChange(InputFileChangeEventArgs e) { await using var stream = e.File.OpenReadStream(); Dispatcher.Dispatch(new UploadZipFileAction { File = stream }); _status = DefaultStatus; } // ... }Now that our UI is dispatching our intention to upload a zip file, we need a way to handle this action. In the
Store\ZipFileUseCasedirectory, create a new classReducers. Make the class static, and add the following code.public static class Reducers { [ReducerMethod] public static ZipFileState ReduceUploadZipFileAction(ZipFileState state, UploadZipFileAction action) { return new ZipFileState { IsLoading = true, ZipEntries = null }; } [ReducerMethod] public static ZipFileState ReduceUploadZipFileResultAction(ZipFileState state, UploadZipFileResultAction action) { return new ZipFileState { IsLoading = false, ZipEntries = action.ZipEntries }; } }Notice that the reducers are pure functions. As such, we don’t have access to our
ZipServiceto process the zip file. To remedy this, we need to create an effect. In theStore\ZipFileUseCasedirectory, create a new class that will receive an injectedZipService, process the zip file passed as a parameter via theUploadZipFileActionaction, and then dispatch a newUploadZipFileResultAction.public class Effects { private readonly ZipService _zipService; public Effects(ZipService zipService) { _zipService = zipService; } [EffectMethod] public async Task HandleUploadZipFileAction(UploadZipFileAction action, IDispatcher dispatcher) { var files = await _zipService.ExtractFiles(action.File); dispatcher.Dispatch(new UploadZipFileResultAction { ZipEntries = files.ToDictionary(k => k.Name, v => v) }); } }Now that we have our effect, in the code-behind file
NavMenu.razor.csinject the state.public partial class NavMenu { [Inject] private IState<ZipFileState> ZipFileState { get; set; } private bool collapseNavMenu = true; private string NavMenuCssClass => collapseNavMenu ? "collapse" : null; private void ToggleNavMenu() { collapseNavMenu = !collapseNavMenu; } }We can now use the state to update the UI and display the zip file entries. Update the
NavMenu.razorwith this code to list the zip file entries.@inherits Fluxor.Blazor.Web.Components.FluxorComponent <div class="top-row pl-4 navbar navbar-dark"> <a class="navbar-brand" href="">BlazorZipExplorer</a> <button class="navbar-toggler" @onclick="ToggleNavMenu"> <span class="navbar-toggler-icon"></span> </button> </div> <div class="@NavMenuCssClass" @onclick="ToggleNavMenu"> <ul class="nav flex-column"> <li class="nav-item px-3"> <NavLink class="nav-link" href="" Match="NavLinkMatch.All"> <span class="oi oi-home" aria-hidden="true"></span> Home </NavLink> </li> @if (ZipFileState.Value.ZipEntries != null) { @foreach (var item in ZipFileState.Value.ZipEntries) { <li class="nav-item px-3"> <NavLink class="nav-link" href="@{ $"web-editor/{item.Value.Name}" }" Match="NavLinkMatch.All"> <span class="oi oi-code" aria-hidden="true"></span> @item.Value.Name.Split('/').Last() </NavLink> </li> } } </ul> </div>
Displaying the content of the C# files using a rich text editor
We are now at a point where we want to display the content of each .cs entry of the zip file and allow the user to modify these with the use of a rich text editor.
To your
.csprojadd a reference to theBlazorMonaconuget package.Then, create a new page titled
Editor.razor.@page "/web-editor/{*filename}" @inherits Fluxor.Blazor.Web.Components.FluxorComponent <h1>@Filename</h1> <div> <div class="form-group"> <MonacoEditor @ref="_editor" Id="exampleFormControlTextarea1" ConstructionOptions="EditorConstructionOptions" OnDidInit="EditorOnDidInit" OnDidChangeModelContent="EditorOnDidChangeModelContent " /> </div> </div>In the code-behind file
Editor.razor.csadd this code to display the content of the selected.csfile.public partial class Editor { private bool _hasLocationChanged = false; [Parameter] public string Filename { get; set; } [Inject] private IState<ZipFileState> ZipFileState { get; set; } [Inject] private IDispatcher Dispatcher { get; set; } private string CsCode { get; set; } = ""; private MonacoEditor MonacoEditor { get; set; } private StandaloneEditorConstructionOptions EditorConstructionOptions(MonacoEditor editor) { return new StandaloneEditorConstructionOptions { Language = "csharp", GlyphMargin = true }; } public async Task LoadFile() { var file = ZipFileState.Value.ZipEntries[Filename]; CsCode = file.Content; await (MonacoEditor?.SetValue(file.Content) ?? Task.Run(() => { })); } protected override async Task OnParametersSetAsync() { try { _hasLocationChanged = true; await LoadFile(); } finally { _hasLocationChanged = false; } await base.OnParametersSetAsync(); } protected override void Dispose(bool disposing) { MonacoEditor?.DisposeEditor(); MonacoEditor?.Dispose(); base.Dispose(disposing); } private async Task EditorOnDidInit(MonacoEditorBase editor) { await LoadFile(); } }
Tracking the changed made to the code
To track and persist the changes made to the .cs files we now need to dispach actions to the store for it to update the state.
In the
Store\ZipFileUseCasedirectory add a new action:public record UpdateZipFileAction { public ZipEntry ZipEntry { get; init; } }We now want to dispatch the
UpdateZipFileActionaction when a charge is made using the rich text editor. Modify the code-behind fileEditor.razor.csand add these two methods:public class CSharpCompilationService { // ... private async Task EditorOnDidChangeModelContent() { if (_hasLocationChanged) { return; } await OnChange(); } private async Task OnChange() { var value = await MonacoEditor.GetValue(); Dispatcher.Dispatch(new UpdateZipFileAction { ZipEntry = new ZipEntry { Name = Filename, Content = value } }); } // ... }The last thing to do it is handling the dispatched
UpdateZipFileActionwith a reducer. InStore\ZipFileUseCase\Reducersadd theReduceUpdateZipFileActionmethod:public static class Reducers { // ... [ReducerMethod] public static ZipFileState ReduceUpdateZipFileAction(ZipFileState state, UpdateZipFileAction action) { var entries = state.ZipEntries .ToDictionary(k => k.Key, v => v.Value); entries[action.ZipEntry.Name] = action.ZipEntry; return new ZipFileState { IsLoading = false, ZipEntries = entries }; } }
Conclusion
In this post we explored the need to save the application state outside the UI components allowing us to persist changes made when navigating to different pages.
In addition we set up the Monaco editor (which powers Visual Studio Code) giving us a pleasant and familiar experience when reading and modifying the C# code.
Here is a demo of the finished result:
The code covered in this blog post is available here:
blog-examples/tree/master/modifiying-the-content-of-the-zip-file-in-blazor